This article contains the AZ4000 Series Shark® POWERDETECT™
Upright Vacuum FAQs. This supports the following models: AZ4000, AZ4002, AZ3901 and AZ4000C.
General Questions
Why is my vacuum tripping the circuit breaker?
Your vacuum draws the most power when you turn it on.
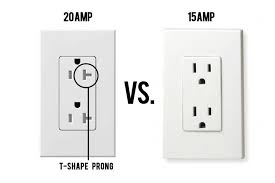
If your circuit breaker trips, please make sure you are plugged directly into a wall outlet on a 15-amp circuit breaker. If not or you are unsure, please plug the vacuum into an outlet on a different circuit breaker and attempt to power it on. If you continue to experience issues tripping the circuit, you may wish to use a 20-amp outlet, indicated by a T-shaped slot.
It is also important that the unit be the only appliance plugged into an outlet when in use. Make sure to power off and unplug microwaves, air conditioners, heaters, and similar large appliances on the same circuit. Then, make sure to power on the unit in the 'Heavy Carpet/Area Rug' setting.
If your unit is tripping a circuit breaker during use, rather than when you first power it on, please contact Customer support.
How do I detach the pod for easier maneuverability on floors?
To clean floors in Powered Lift-Away® mode:
• Release the power cord by turning the top cord hook.
• Press the Powered Lift-Away® button on the top of the pod handle.
• Detach the pod from the wand by pulling up on the dust cup handle. For easier cleaning on stairs:
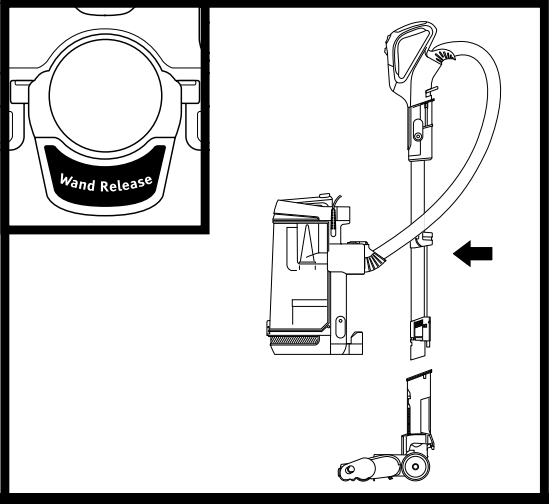
• Press the handle release button to detach the handle from the top of the wand.
• Press the Wand Release button to remove the wand from the nozzle.
• With the wand removed, attach the handle directly to the nozzle.
How do I detach the pod for portable above-floor cleaning?
To clean above-floor areas in Lift-Away® mode:
• First release the power cord by turning the top cord hook.
• Press the Powered Lift-Away® button on the top of the pod handle.
• Detach the pod from the wand by pulling up on the dust cup handle.
• Detach the wand from the nozzle by pressing the wand release button.
• Press the handle release button to detach the handle from the top of the wand.
• For more reach, reattach the handle to the wand.
• Attach a cleaning accessory to either the handle or the end of the wand.

What do the different color head lights mean?
The headlights will flash or turn red to indicate issues that need attention.
Solid White Lights: The brushrolls are spinning and the unit is working as it should.
Solid Red Lights: There is a jam in the brushroll area. Turn off the vacuum and unplug it, then remove any blockages in the nozzle.
Flashing Red Lights: The motorized floor nozzle is overheating. Turn off the vacuum, unplug it, and remove any blockages. Let the vacuum cool down for at least 60 minutes before restarting.
Flashing White Lights: The vacuum is operating in an environment that is either too hot or too cold. This vacuum will only function properly in temperatures ranging from 32°F (0°C) to 104°F (40°C). Turn the vacuum off and adjust the room temperature.
See Troubleshooting section for more information.
Vacuum Usage
When and how do I clean the filters?
<go to 1:10 in the above video for instructions on removing and rinsing the filters>
Filters may need to be cleaned if the vacuum stops picking up dirt, if airflow is restricted, or if you notice lighter or no suction. For optimal cleaning and odor neutralizer technology performance, clean filters regularly. Between cleanings, lightly tap filters over a trash receptacle to remove dust and debris as needed.
Rinse the pre-motor foam and felt filters every month, or as needed.
• Remove the dust cup to access the pre-motor filters.
• Press the release button on top of the pod. Lift the dust cup up and away from the pod.
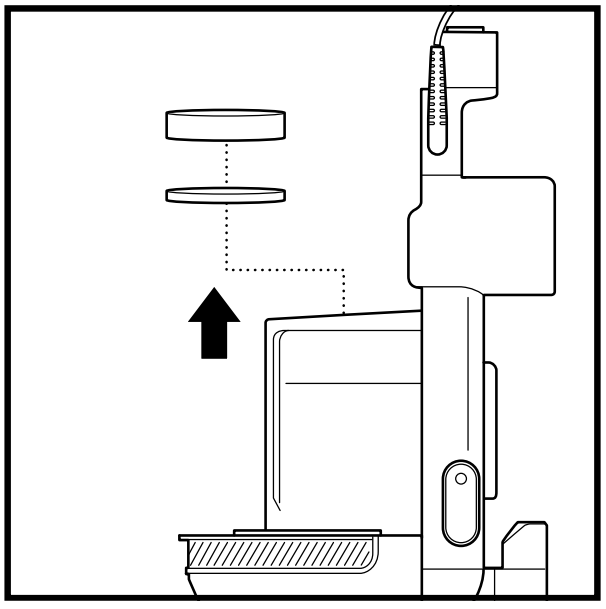
• Remove the foam and felt filters from underneath the dust cup.
• Rinse both filters with water only.
• Allow filters to air-dry completely (at least 24 hours) before reinstalling.
• Once the filters have dried, install the felt filter first, followed by the foam filter.
• Reinstall the dust cup by placing the bottom of the dust cup into the pod and then tilting until it clicks into place.
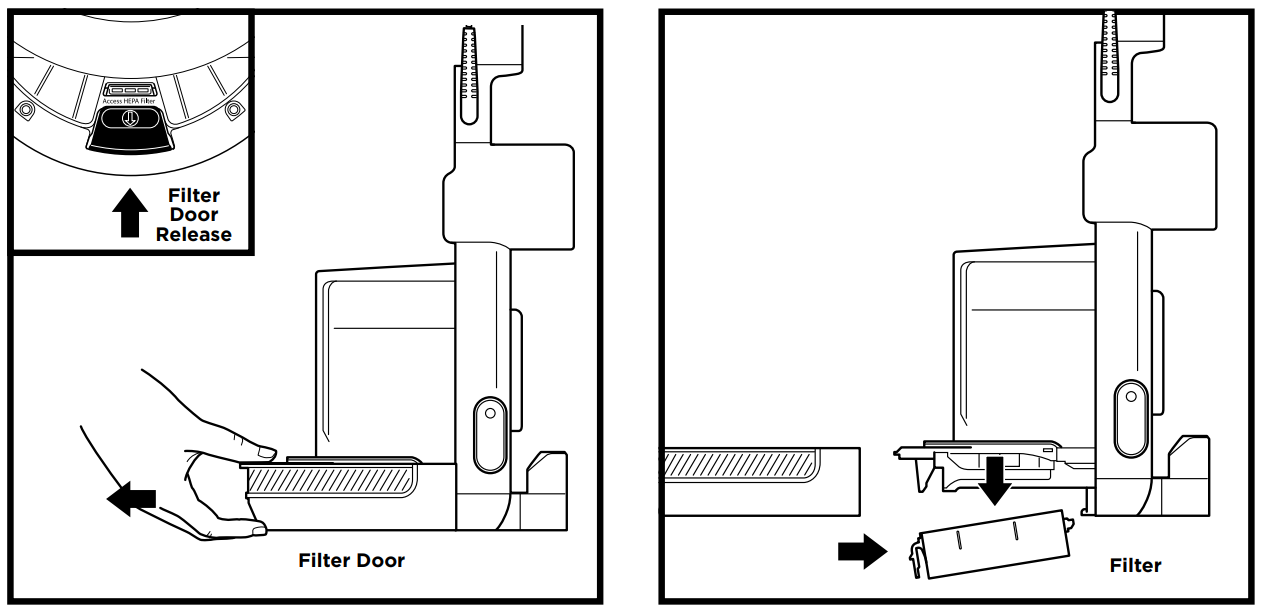
 Rinse the post-motor HEPA filter every 12 months, or as needed.• With the dust cup removed, pull the tab on the bottom of the pod to release the HEPA filter cover.• Press the latch on the HEPA filter to remove the filter.
• Rinse with water only.
• Allow filter to air-dry completely (at least 24 hours) before reinstalling.
• Once the HEPA filter has dried, reinstall it.
• Reattach the HEPA filter cover until it clicks into place.
When and how do I empty the dust cup?
<go to 0:24 in the above video for instructions to empty the dust cup>
For optimal performance, empty the dust cup each time you vacuum, or when debris reaches the MAX FILL line.
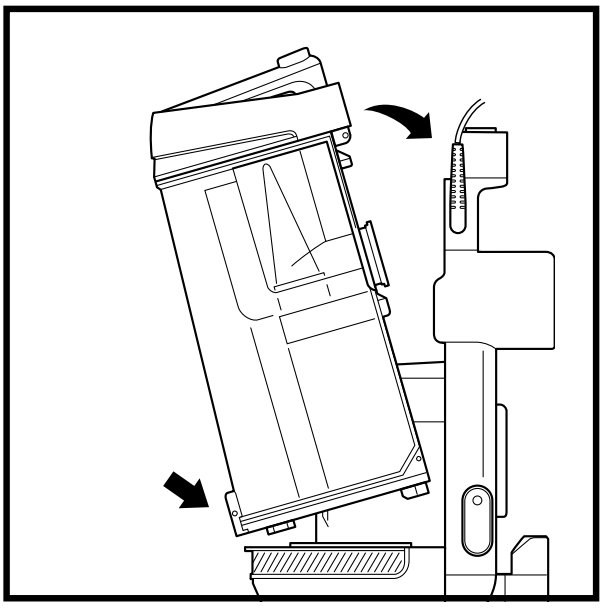
Press the button on the top of the pod. Tilt the dust cup down, away from the wand, then pull it up and away from the pod.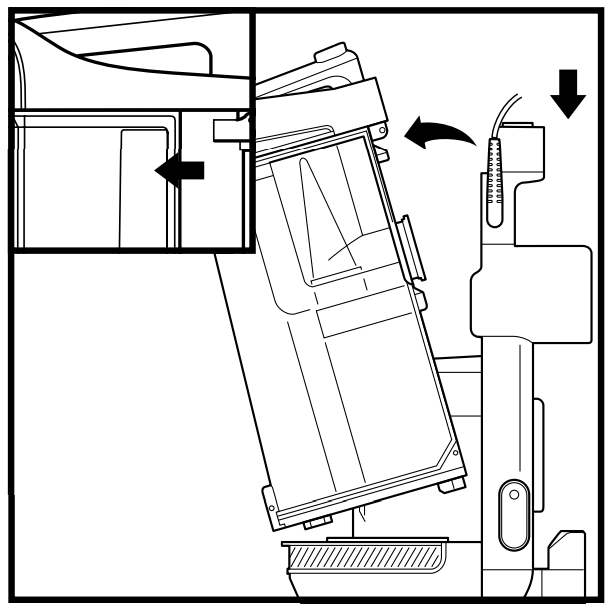 Hold the dust cup over the trash. Press the lower release button and bottom of dust cup will drop open.
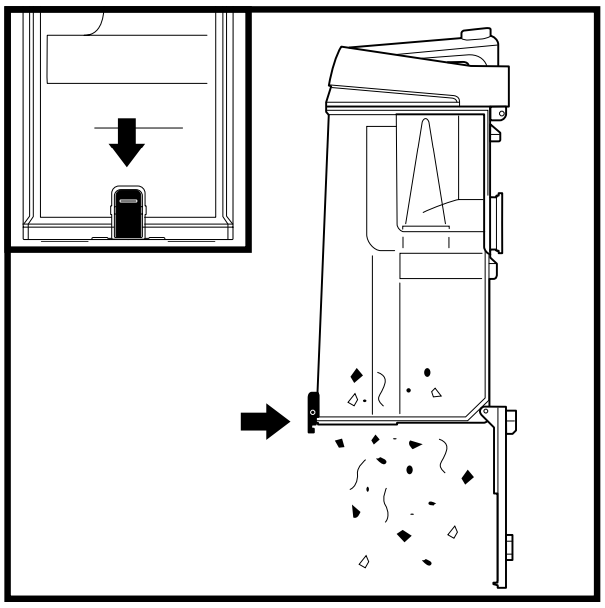 Tap gently to empty contents.To remove debris from the cone-shaped lint screen, press top release button and lift handle to access screen.
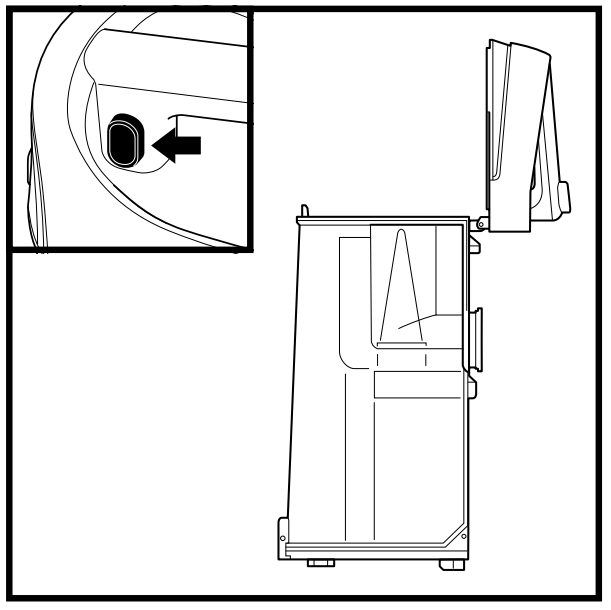 To reinstall, place the bottom front of the dust cup into the pod, then tilt it back toward the wand until it clicks into place.
How do I access and clean the main brushroll?
• Detach the pod from the nozzle by pressing the Powered Lift-Away® button on top of the dust cup handle.
• Detach the wand from the nozzle and then place the nozzle on a flat surface, with the bottom facing up.
• Using scissors, carefully remove any string, hair, or debris that may be wrapped around the brushroll.
• Reattach the wand to the nozzle. Then slide the pod back onto the wand until it firmly clicks into place.
Note: Do not vacuum wet messes.
What should I do if my vacuum is hard to push or pull?
Check to see which floor setting you are using.
For thicker carpet types, slide the surface selector to Thick Carpet/Area Rug. This setting reduces suction and should allow for easier use on carpet.
If changing the floor setting doesn't help, try using Powered Lift-Away® mode.
What happens if I experience small static shocks while vacuuming?
Certain dry temperatures in winter or dry desert areas may cause common static electricity to build up in the vacuum, producing small shocks, similar to what you might experience from contact with doorknobs, wool sweaters, or blankets. This is harmless. In order to avoid this, we recommend moisturizing your hands and/or removing wool socks or sweaters prior to vacuuming.
What should I do if the Soft Roller doesn't eject when I slide the release button forward?
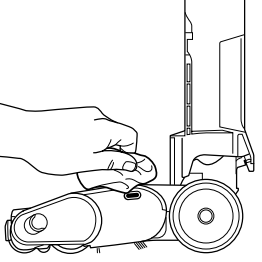
If the Soft Roller doesn't eject when you slide the button forward, there may be some debris caught around the Soft Roller.
Slide the button forward again. If the roller still won't eject, gently pull on the right corner of the roller while sliding the button forward again. This should eject the roller and dislodge any debris.
Once the Soft Roller has been ejected, carefully remove any remaining hair or debris from the Soft Roller and its connection points in the nozzle.
Once all debris has been removed, please reinsert the Soft Roller and try slide the access button forward again.
Why is my vacuum stalling on my thick carpet?
Try doing manual override to Thick Carpet/Area Rug mode setting as this is optimized to not stall on thicker carpets.
When and how to clean the Floordetect sensor?
<go to 1:14 in the above video for instructions on cleaning your FloorDetect sensor>
Make sure to clean the Floordetect sensor regularly, as hair and other debris may build up and obstruct the sensors. If the sensor is partially obstructed, Floordetect mode will not function as expected.
To easily access the nozzle for sensor cleaning, press the Powered Lift-Away button to detach the pod, then press the wand release button to detach the wand from the nozzle.
Locate the FloorDetect sensor on the bottom of the nozzle.
Use a cotton swab to wipe away dirt and debris from the sensor and surrounding area.
When and how to clean the Edgedetect sensors?
<go to 1:24 in the above video for instructions on cleaning your EdgeDetect sensors>
Make sure to clean the Edgedetect sensors regularly, as hair and other debris may build up and obstruct the sensors. If the sensor is partially obstructed, Edgedetect mode will not function as expected.
To easily access the nozzle for sensor cleaning, press the Powered Lift-Away button to detach the pod, then press the wand release button to detach the wand from the nozzle.
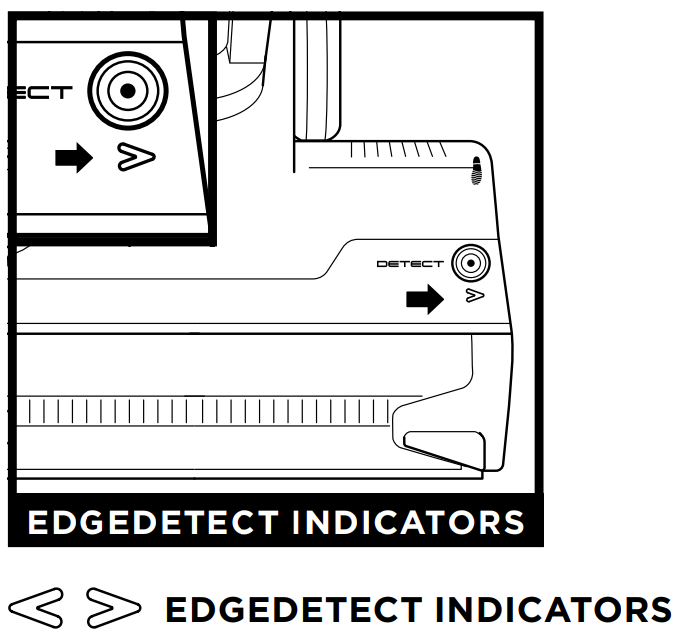
Locate EdgeDetect sensors on the sides of the nozzle (small clear ovals on the top, rear edge).
Check the sensors, and remove any dirt or debris that may be blocking them.
Gently wipe the sensors with a microfiber cloth, using a circular motion.
When and how to clean the Dirtdetect sensors?
<go to 0:33 in the above video for instructions on cleaning the DirtDetect sensors>
Make sure to clean the Detect sensors regularly, or when the DirtDetect Indicator is red, as hair and other debris may build up and obstruct the sensors. If the sensors are partially obstructed, Detect mode will not function as expected.
To easily access the nozzle for sensor cleaning, press the Powered Lift-Away button to detach the pod, then press the wand release button to detach the wand from the nozzle.
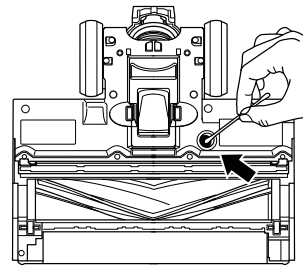
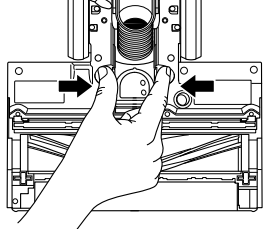
Turn the nozzle upside down and locate the nozzle inlet access point between the brushrolls and rear wheels.

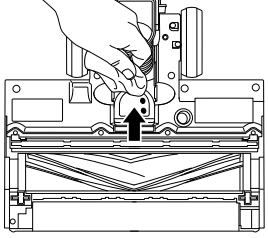
Pinch the nozzle hose inlet and pull open the door. Arrows indicate the two small DirtDetect sensors.

Gently wipe the sensors with a microfiber cloth and remove all hair and debris

Why would I use DETECT mode?
Detect mode allows you to use the vacuum with the full suite of Smart Detect Technology activated. In this mode, the vacuum will detect floor type, dirt, and edges, and will automatically adjust suction to maximize cleaning performance. We recommend using this most for best user experience.
What is FloorDetect?
FloorDetect identifies surface type and adjusts brushroll speed and suction for optimized cleaning.
What is EdgeDetect?
EdgeDetect focuses and maximizes suction along corners and edges to target stubborn dirt.
What is DirtDetect?
DirtDetect identifies dirty areas and automatically boosts suction power to pull in hidden dirt.
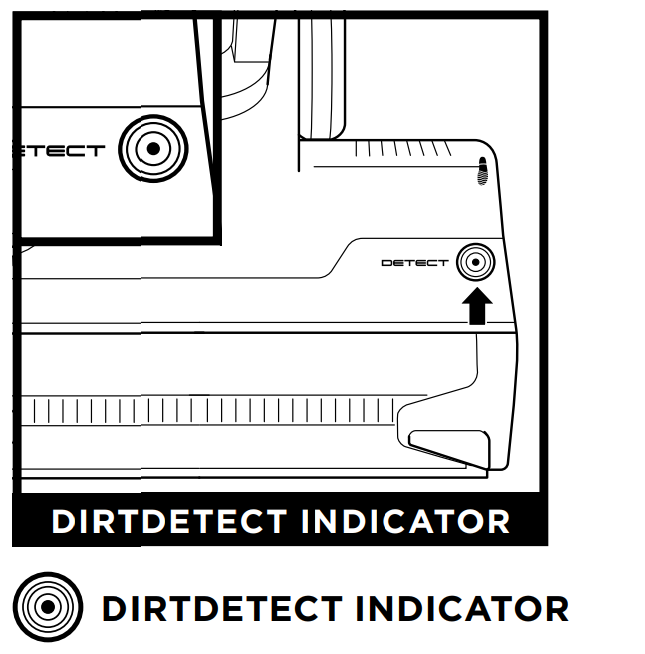
Why is the Dirtdetect light staying Purple?
The DirtDetect indicator is located on the Floor nozzle. When it turns purple, this indicates that dirt is detected.
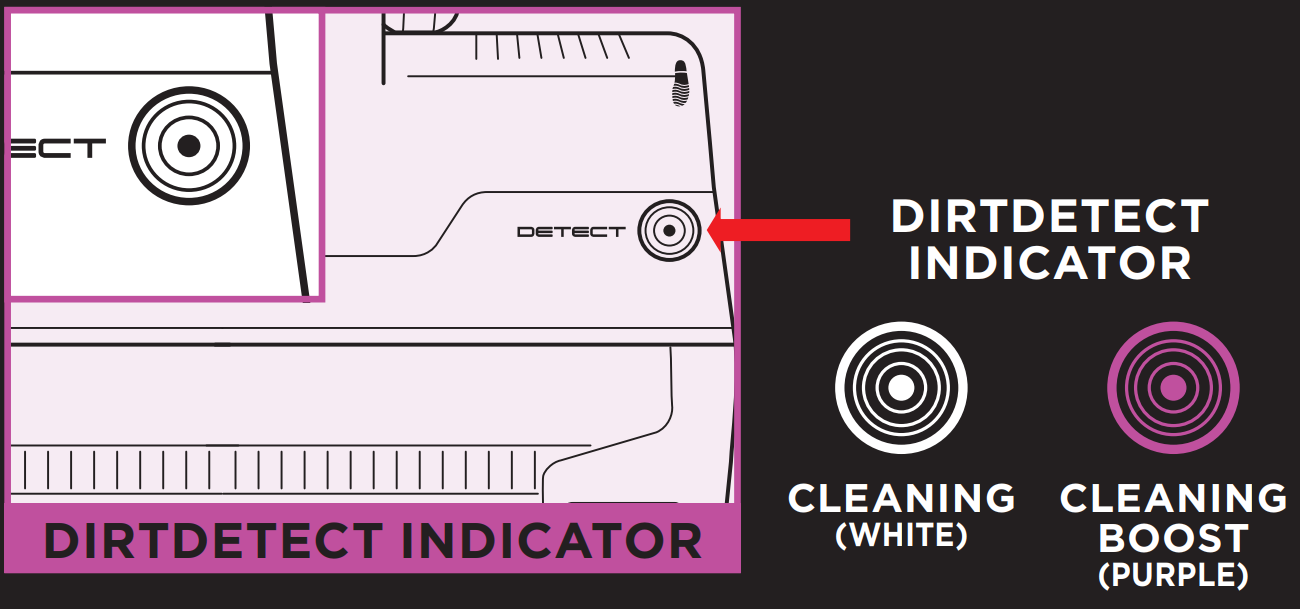
The vacuum senses high levels of debris on the surface you are cleaning and will increase suction to pull in hidden debris. The sensors may detect dirt that you are not seeing and may stay purple longer than you may expect. This happens particularly on carpets and in high traffic areas or if the sensors are dirty, and does not affect the overall suction and cleaning performance of the unit.
Note: Some carpets (old or worn out) may be prone to shedding. This may cause continuous dirt detect activation. Verify dirt detect on clean hard surface to ensure there is not issue with the sensor.
How to clean the DirtDetect Sensors:
To easily access the nozzle for sensor cleaning, press the Powered Lift-Away button to detach the pod, then press the wand release button to detach the wand from the nozzle.
Turn the nozzle upside down and locate the nozzle inlet access point between the brushrolls and rear wheels.

Pinch the nozzle hose inlet and pull open the door. Arrows indicate the two small DirtDetect sensors.
Gently wipe the sensors with a microfiber cloth and remove all hair and debris
You can view a video on how to clean all the sensors in the Floor nozzle by going here.
How do I Install the odor neutralizer technology system?
1. Remove the odor neutralizer technology dial from the bag. Flip up the dial handle, align the teal arrows, then insert the dial into the nozzle.

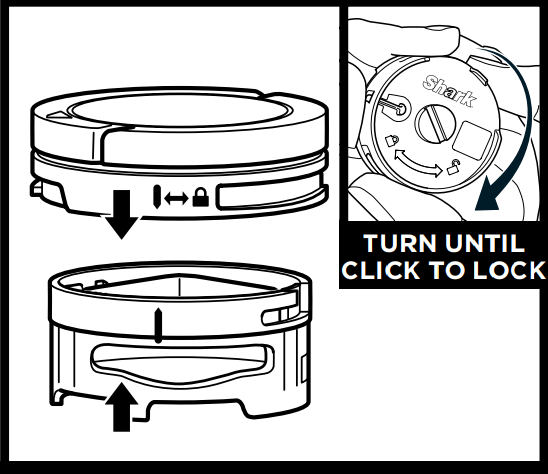
2. To lock and engage the dial, rotate it counterclockwise until it clicks into the desired odor intensity setting.
How do I replace the cartridge in my odor neutralizer technology system?
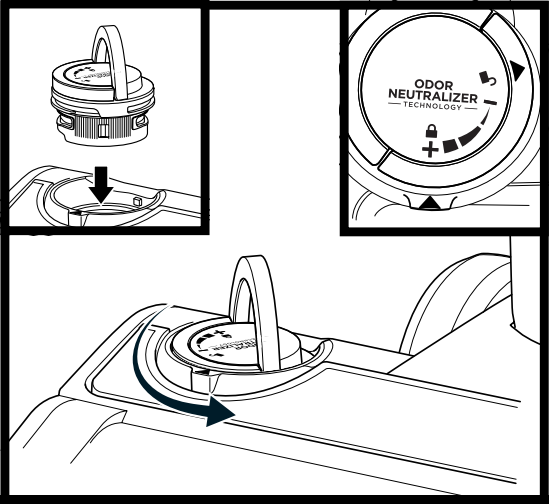
1. Flip up the handle and rotate the dial clockwise until the two teal arrows are aligned. Pull the handle to remove the dial from the nozzle. 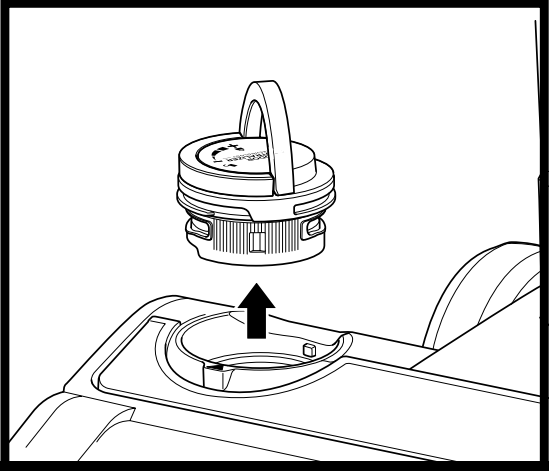
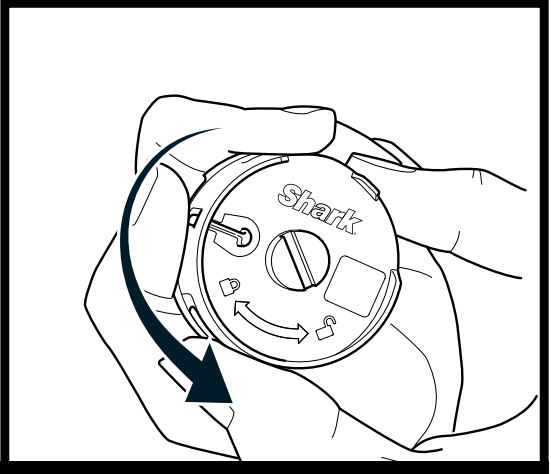
2. Rotate the cartridge counterclockwise in the dial housing and pull out the cartridge to remove it.
3. Remove the new odor cartridge from the sealed packaging. To maintain the life of the cartridge, keep it in the sealed packaging until you are ready to install it.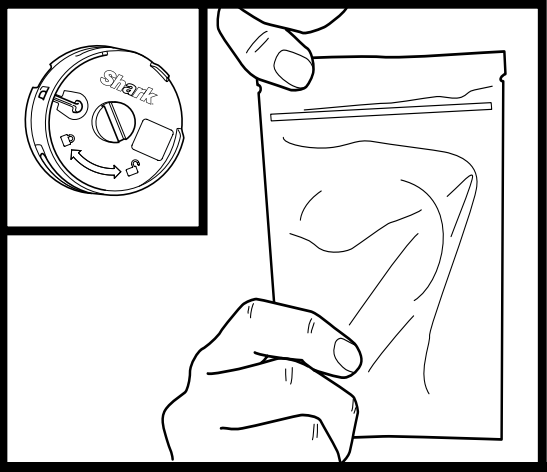
4. To lock in place, rotate the cartridge clockwise until the yellow arrow on the cartridge clicks into place and points to the yellow lock on the dial cover.

5. Align the teal arrow on the dial cover with the teal arrow on the nozzle, then reinsert the dial into the nozzle. Rotate the dial counterclockwise until it clicks into an intensity setting to engage. Rotate further to change the intensity setting.

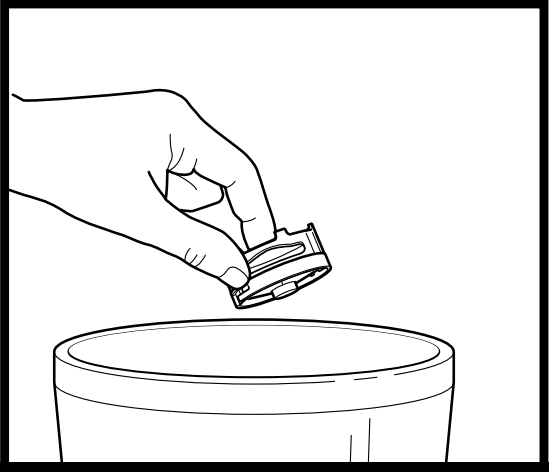
6. Dispose of old cartridge by dropping it in the trash.
How do I adjust the intensity setting of my odor neutralizer technology system?
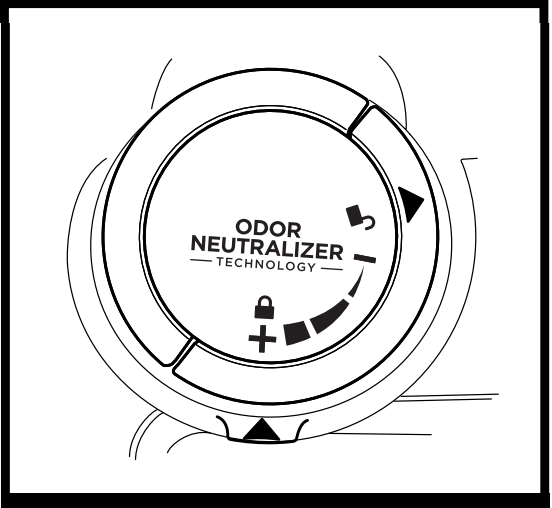
1. Flip up the dial handle and rotate the odor dial to adjust odor neutralizer technology intensity or to unlock the dial for cartridge access.
2. To lower the intensity: rotate the dial toward the Low position to decrease the intensity to the lowest level when the vacuum is in use.
3. To increase the intensity: rotate the dial toward the High position for the highest intensity level when the vacuum is in use. This position is the recommended setting for optimal performance.
Do I need to replace my Odor neutralizer technology cartridge?
Yes, odor neutralizer technology cartridges should be replaced every 6 months for optimal performance.
I dislike the scent or it's too intense at the lowest setting. Can I remove the odor neutralizer technology system?
The odor dial cover needs to be installed for the vacuum to function properly. If you do not wish to use the odor neutralizer technology system, please follow the below steps:
1) Remove the odor dial from the nozzle. Flip up the handle and rotate the dial clockwise until the two teal arrows are aligned. Pull the handle to lift the dial out of the nozzle.
2) Remove the odor cartridge by rotating the cartridge counterclockwise in the dial housing and pull out the cartridge.
3) Install the dial cover back into the nozzle without the cartridge. Align the teal arrow on the dial cover with the teal arrow on the nozzle, then reinsert the dial cover into the nozzle. To lock, rotate the cover counterclockwise until it clicks into place.
4) Dispose of cartridge by dropping it in the trash.
The odor neutralizer technology system has no smell, or is less intense. Is it working?
The intensity of the odor neutralizer technology’s fragrance may diminish over time. It may also have no noticeable fragrance at all. This is natural and does not indicate the technology isn’t working. Follow replacement instructions to ensure continued performance.
This technology only works when the vacuum is in operation.
Is any maintenance required for my odor neutralizer technology system?
Clean all filters as recommended in the Owner's Guide.
1) Empty the dust cup before storing your vacuum.
2) Replace the cartridge every 6 months.
3) Visit qr.sharkclean.com/odortech to learn more and purchase replacements.
4) If wet pet messes are cleaned up, thoroughly clean the vacuum.
What is the scent in the Odor Neutralizer Technology Cartridges?
Ocean Breeze.
This is the only scent available.
Does Shark sell any other scent options?
Visit qr.sharkclean.com/odortech for more information and our latest available scent offerings. Offerings may change over time and may be limited.
How should I dispose of my old odor neutralizer technology cartridges?
The odor neutralizer technology cartridges can be disposed of in the trash. Do not litter. Due to their size, cartridges cannot be recycled.
Is the odor neutralizer technology safe to use around pets and children?
Yes, but please read the Owner's Guide and carefully follow all warnings and safety instructions.
How does the Odor Neutralizer Technology work? Does it have an air freshener smell and mask the odor?
The Odor Neutralizer Technology molecules are specially created to seek out the bad odors inside your vacuum and transform them for a
better overall experience. As the vacuum operates, the Odor Neutralizer Technology molecules interact with the odorous debris as it moves through the vacuum's system leaving a fresher smell coming out of the exhaust. There is also the option to adjust the intensity of the smell to your liking, right on the nozzle.
Product Specs and Accessories
What is the weight of the vacuum?
AZ4000 - 17.08 lbs
AZ4002 = 17.57 lbs.
What are the dimensions?
12" L x 10.65" W x 46.1" H
What is the dust cup capacity?
The dust cup capacity is 20 quarts.
What is the cord length?
The cord is 30 feet long.
What is the Wattage?
1416 Watts
What is the Amperage?
11.8 Amps
What is the Voltage?
120 Volts
Getting to know the accessories
Click the image of the accessory you would like to learn more about
Note: Not all accessories come with all units and are subject to availability
