This article contains the FAQs for the VS100 Series Shark® MessMaster™ Portable Wet/Dry Vac. This supports the following SKUs: VS100, VS100C, VS101, VS101C, VS105, VS101QBL, VS101QBA, VS101QBK and VS101QGN.
General Questions
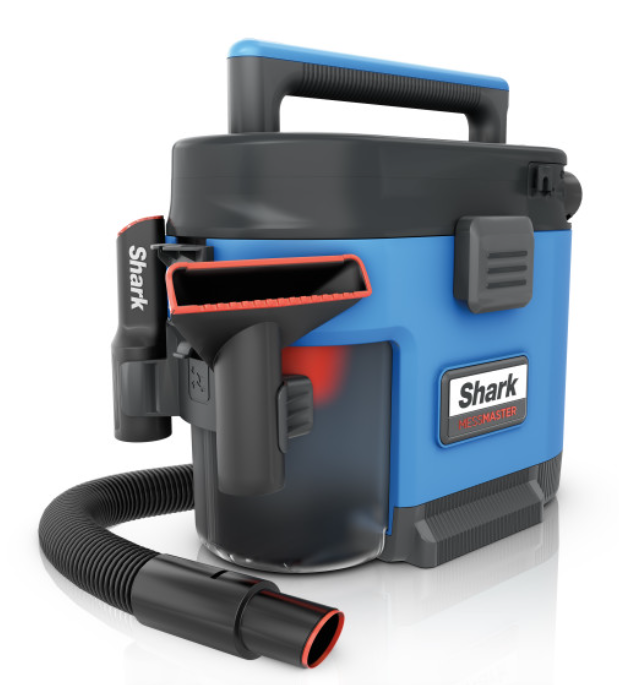
How do I assemble the MessMaster™?
Remove the unit and all components from the box. Place the main unit on the floor. To attach the hose, insert the hose connector into the opening on the side of the unit and twist clockwise to the lock symbol. Wrap the hose around the unit lid. Clip the hose to the unit by sliding the opening on the hose inlet down onto the hose storage hook until it clicks into place. Insert the accessory holder into the notch on the side of the unit and press the base towards the dust cup until it clicks into place. Insert accessories into the slots on the accessory holder until they snap into place. Neatly wrap the cord around the unit handle for storage. Use the cord clip on the plug to hold it securely in place.
How do I turn the MessMaster on/off?
Press the power button to turn on the vacuum. Press again to turn off.
What can the MessMaster pick up?
The MessMaster has been designed to pick up any mess, even the unvacuumable. We recommend using the provided accessories as designed for the most effective pickup.
Do I need to have the orange cone-shaped debris screen installed for use?
Yes. The debris screen needs to be installed in the unit at all times during use for both wet and dry pickup.
Do I need to use a bag every time I clean?
The MessMaster can be used with or without a bag inside the dust cup. For quick, lowmaintenance cleans, we suggest vacuuming straight into the dust cup without a bag. For tougher messes, utilize AnyBag technology by inserting any plastic trash bag (2 gallons to 13 gallons) to line the inside of the dust cup for easy disposal of debris. Carefully inspect the bag for damage or holes. DO NOT use a bag with holes.
DO NOT use a bag when vacuuming sharp or industrial debris.
What type of bag can be used inserted into the dust cup?
With Shark's AnyBag Technology, any trash bag between 2 - 13 gallon capacity can be inserted into the dust cup for quick and easy cleanup of tough debris. Make sure there are no holes in the bag. Shark also provides a bag kit that contains three bags to get you started. Shark recommends using 4 gallon plastic trash bags.
How do I insert a bag into the dust cup for messy cleans?
- Pull out on the bottom of the lid latch to release. Pull the latch down to unhook from the lid.
- To open the lid, lift it by the handle.
- Insert an undamaged plastic bag to line the inside of the dust cup. Push the bottom of the bag down to the base of the dust cup.
- Tuck the bag edge between the bag guides and dust cup shelf.
- Run any excess bag through the bag holder slot on the top of the accessory holder.
- Close the lid to secure the bag in place. The lid should clamp over the excess bag.
What accessories can be used for wet vs. dry cleaning?
The MessMaster has many different cleaning attachments designed for both wet and dry mess cleaning. The following accessories can be used for wet cleaning: Squeegee Tool, Crevice Tool, Claw Tool*, and 3-Piece Extention Wand*.
*Not included in all configurations.
What are the best ways to clean with the hose and accessories?
Hose Inlet: For quick cleanup of any type of mess. The end of the hose also works great for larger debris that cannot fit in the other accessories.
Crevice Tool: Great for cleaning fine and small debris from hard-to-reach crevices, corners, and other tight spaces.
Squeegee Tool: A tool designed to clean wet and mixed messes on bare floors. Also effective at removing stubborn embedded pet hair from carpet and upholstery.
Claw Tool: Designed to draw out embedded dirt and debris for easy cleanup on carpets, mats, and upholstery.
Wide Mouth Tool*: The wide intake draws in large messes on bare floor surfaces while also handling fine particles and medium-sized dry debris. (Not intended for use on carpets.)
3-Piece Extension Wand*: This three-piece wand can extend your cleaning reach for quick and easy pickup. Use a single piece, or fit together 2 or 3 parts for maximum length. Wand works best with Wide-Mouth Tool.
Pet Multi-Tool*: A single convertible tool for cleaning tough pet messes two ways: use the stiff bristle brush to clean stuck-on debris, or take off the bristles to reveal an upholstery tool perfect for removing stubborn pet hair and large piles of debris.
*Not included in all configurations.
Can I use bleach to clean the unit?
We do not recommend using bleach as it can damage the unit. For deeper cleans we recommend distilled white vinegar.
Can I plug in the MessMaster into my car outlet?
No. Most car outlets do not provide enough voltage to support the MessMaster in use.
Please plug into a home or outdoor oulet instead.
What happens if I experience small static shocks while vacuuming?
Certain dry conditions in winter or dry areas may cause common static electricity to build up in the vacuum, producing small shocks, similar to what you might experience from contact with doorknobs, wool sweaters, or blankets. This is harmless. In order to avoid this, we recommend moisturizing your hands and/or removing wool socks or sweaters prior to vacuuming. You can also wipe over the unit, particularly the handle, with a dryer sheet or damp paper towel to reduce the buildup of static.
Cleaning and Maintenance
When and how should I clean the unit?
- Run a rinse & ready cleaning cycle after picking up any wet or organic mess.
- Empty the dust cup or remove and dispose of the bag.
- Vacuum up 10 oz. of water from a cup, bowl, or other container.
- Unplug the unit and open the lid, then lift out the dust cup by the sides. DO NOT grab the dust cup by the bag guides. Dump remaining debris into the trash and rinse out the dust cup with warm water. Allow the dust cup to air-dry completely before reinstalling it back into the unit.
- Remove the lid from the unit by opening the lid to a 180-degree angle and pulling out to detach it from the hinges.
- Twist the debris screen counterclockwise and pull it out.
- Rinse the lid and debris screen in the sink with warm water. Allow the lid and debris screen to air-dry completely before reinstalling.
- To reinstall the debris screen, align the arrow in the lid with the arrow on the side of the debris screen and twist clockwise to the lock symbol to secure.
- To reattach the lid, align the hing connection points at 180 degrees and push until it snaps into place.
- Once all components are dry, close the lid and secure the latch.
When and how should I clean the filters?
Regularly rinse and replace the filters to maintain your unit’s suction power. To prevent damage from cleaning chemicals, rinse filters with cold water only. Allow all filters to airdry for at least 24 hours before reinstalling them to prevent liquid from being drawn into electrical parts.
IMPORTANT: DO NOT use soap when cleaning the filters.
Pre-Motor Filters:
- Rinse the pre-motor filters every month and replace every year.
- Release the lid latch and open the lid. Locate the filters sitting within the main unit next to the dust cup.
- Lift out the foam filter by the handle, then pull out the felt filter.
- Rinse both filters with cold water ONLY. DO NOT use soap. Allow both filters to air-dry completely before reinstalling.
- Once fully dry, reinsert the felt filter first, followed by the foam filter.
Post-Motor Filters:
- Rinse the post-motor filters every month and replace every year.
- Locate the post motor filter cover sitting within the main unit next to the pre-motor filters.
- Pull up on the post-motor filter cover to remove it, then lift out the post-motor filter.
- Wash the post-motor filter gently with cold water ONLY. DO NOT use soap. Leave the filter out to air-dry completely before reinstalling it.
- Reinsert the post-motor filter back into the opening, then place the cover over it and press down until it clicks into place.
When should I replace my filters?
Both pre- and post-motor filters should be cleaned every month and replaced every year.
When and how do I empty the dust cup?
For optimal performance, empty the dust cup each time you vacuum, or when debris reach the MAX FILL (1 Gallon for dry debris, 0.5 Gallon for wet debris).
- To remove the dust cup, open the lid, then lift out the dust cup by the sides. DO NOT grab the dust cup by the bag guides.
- Dump remaining debris into the trash and rinse out the dust cup with warm water. Allow the dust cup to air-dry completely before reinstalling it back into the unit.
*The dust cup is also dishwasher safe.
When and how do I clean the accessories?
- Clean the accessories after picking up a wet or organic mess.
- The Squeegee Tool, Crevice Tool, Claw Tool, and 3-Piece Extension Wand are dishwasher safe (top rack only).
- If you cannot use a dishwasher, the accessories can be rinsed in the sink with warm, soapy water.
Product Specs
What is the dust cup capacity?
The dust cup has a dry debris capacity of 1 gallon and a wet debris capacity of 0.5 gallons. When vacuuming wet or sloppy messes, do not fill the dust cup above the Wet Debris Max Fill line. Filling beyond the line can result in leaks.
When debris reaches the Max Fill line, the float mechanism in the dust cup will rise automatically to cut off airflow. Suction will cease and motor noise will become higher in pitch. When this happens, turn off the vacuum, unplug the power cord, and empty the dust cup.
What is the Wattage?
950 Watts
What is the Voltage?
120 volts
What is the cord length?
The cord is 15 feet long
What is the weight of the unit?
9.8 lbs
What are the dimensions?
10.5" (L) * 16.5" (W) * 13.5" (H)